Social engineering, in particular through the medium of email, is very likely the greatest threat to an average organization. While 0-days do come around and pose real threats to organizations and many of them do not implement strong patch management programs, phishing is simply easier and more effective for the majority of attackers.
This article will cover why phishing is such a serious risk, how to set up a system to phish your own company to implement an employee training system with metrics and large amounts of customization, and will cover some technical measures which can help protect your organization from phishing attempts.
–Getting up to Speed —
Phishing often arrives in one of three forms – the spoofed email (an email which shows as sent from one account but was actually sent from another, an apparently internal email, and an apparently external email. A short description of the three types follows here:
- The spoofed message. There are ‘headers’ inside of email messages and a whole process and procedure which mail servers follow in order to allow a message from one user to get to another. To the recipient there is a particular field, the sender field, which seems trustworthy….it is not always the case. Depending on the spam filter and mail server settings which are in place, it is possible to ‘spoof’ the sender to appear as something else. This is often the case when a message arrives appearing to be from a boss or executive but actually originated elsewhere.These messages will often either contain malicious payloads (macro-infested word documents with topics like ’employee bonuses’, ‘salary info’ or other click-baity terms), links to malicious sites (places to do browser exploits or capture credentials), or urgent commands to teams like finance requesting immediate transfer of funds to an attacker-owned account.
- Typosquatting. One of the most important pieces of a message to assess when determining if it is legitimate or a phish is to look at the domain name. End users, however, don’t usually pay too much attention to this. One of the most effective types of phishing campaigns utilizes a ‘similar’ domain to the target and sends mail impersonating a user from the real domain. Often the legitimate sender (ex. [email protected]) will be impersonated by someone owning a similar domain. For example, this would be a valid email from someone who owns company.co (not .com): [email protected] the average end users, this would be extremely hard to differentiate, especially on mobile phones and less-than-ideal devices for viewing the sender field.Further information on this technique is listed here:
- If the company was ‘example.com’ the following domains, if purchased, could send mail which looks extremely similar: exannple.com, example.co, examp1e.com and so forth.
- Letter substitutions (i for ‘l’ because capital ‘I’s look identical in many web clients), ‘ln’ for ‘h’ or ‘nn’ for ‘m’, ‘0’ for ‘o’, ‘1’ for ‘l’, and so forth.
- Fake Trusted Domains. This is by far the most prevalent type of phishing ruse, it consists of sending an email which appears to be from a legitimately trusted domain but is not. The benefit of this type of campaigns is that they appeal to broad ranges of targets. Often Amazon, Fedex, UPS, and others are impersonated for campaigns like this. Since so many people might believe a message about a missed order, changed password, or breach notification the emails will consistently generate clicks; especially through mobile or other means which make verification of target domain non-trivial.An example of this might be something like the following message:
- Subject: Missed Package Delivery – LAST NOTIFICATION
- Sender: [email protected]
Those are the primary types of source ruses phishing emails will utilize. The next thing to cover is ‘why do people phish?’, which turns out to be a very easy question to answer.
Phishing works. Phishing gives credentials. Phishing infects machines. Phishing earns money.
Some examples to back this up include:
- Ransomware is most commonly delivered via infected documents or other malicious payloads.
- Spoofed emails from CEOs or CFOs sent to finance team members with instructions to immediately deposit funds to accounts are sometimes successful.
- Emails purporting to be from Amazon, Google, or other major companies which direct targets to fake sign-in pages are able to capture huge numbers of credentials.
- Emails targeting specific companies can contain links to legitimate-looking sites which request logins and therefore compromise domain credentials
- Emails with malicious payloads can be used to install software which turns the computer in to a member of a botnet and/or which enables the attacker to spy on the individual who opened those payloads.
In short, phishing is a relatively low-effort task which can have tremendous rewards.
Why don’t you just go and phish yourself?
This section will cover, in detail, the steps required to set up a program to phish your company, train your users, and provide metrics to demonstrate increased resistance to malicious phishing campaigns. Before going any further this is for educational use and legitimate red-team use only and it is not to be used in any way for illegal activities.
The expected budget should be less than $10 to get started and then less than $5/month to continually run the program thereafter. We will be using the following tools/services to get started:
- GoPhish
- Postfix-Server-Setup.sh
- Digital Ocean
- Namecheap/Godaddy/other domain name provider
There are some challenges to overcome in order to deliver a successful phishing campaign. First, presenting a convincing mail server to your organizations mail server, this involves setting up SPF, DKIM, DMARC, and other records to ensure the remote server trusts your server. Failing to do this can result in emails being marked as spam or suspicious. Additionally, creating compelling websites and emails can be challenging, especially if you want to go the whole 9 yards and have a valid HTTPS website.
Following this guide, especially after your first run, should let you go from 0-to-phishing in less than 10 minutes! Let’s get started.
Step 1 — Choose your domain
This is one of the most important steps of the process, picking a believable domain name is critical in order sway your targets most effectively. Take your domain name and try some variations like mentioned in the typosquatting section above. DNSTwist (https://github.com/elceef/dnstwist) is a fantastic tool for discovering possible domain name variations on your target domain. If you would rather do an external type of phishing, investigate common domains (amazon, google, fedex) and search for available domains like the following: ‘deliveries-fedex.com’, ‘amazon.com-security.com’.
For this tutorial we will be using the following bits of information.
- Actual Domain Name: realdomain.com
- Actual Webmail portal: webmail.realdomain.com
- Phishing Domain Name: reaidomain.com – when the ‘i’ is capitalized it looks like an ‘l’ in most mail clients.
With this decided, the next step would be to buy the domain ‘reaidomain.com’. This is the domain I will be referring to for the rest of this blog.
Once purchased we can begin setting up domain DNS records, I will cover each as we get to them but the finished result should look something like this:
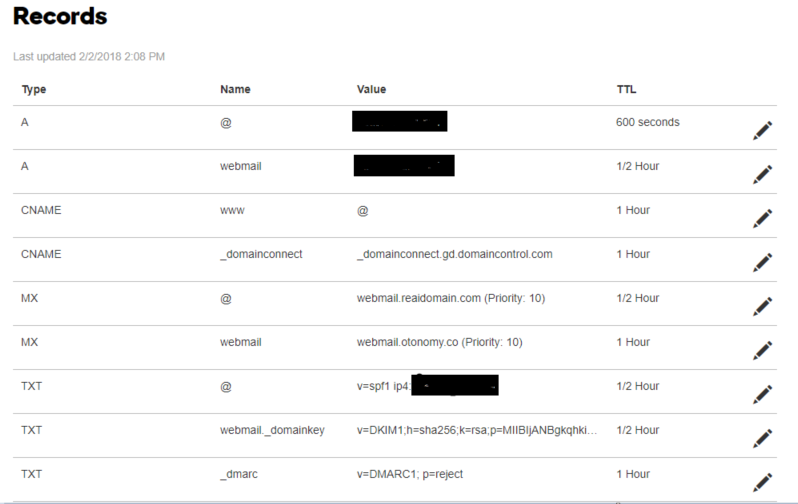
Don’t worry about these for now, we will configure them later! If you’re feeling ambitious, try to figure out what each of them do and consider if each of them are necessary.
Step 2 — Get A Server
In this step we will be setting up the server which will send our phishing emails and receive the clickbacks from our phishing links. For this tutorial I will be using Digital Ocean but other providers or using your own controlled systems is also acceptable. The primary reason we are using Digital Ocean in this tutorial is that they allow for the owner of the droplets (server) to set the PTR record. This is one of the requirements for a mail server to bypass email filters.
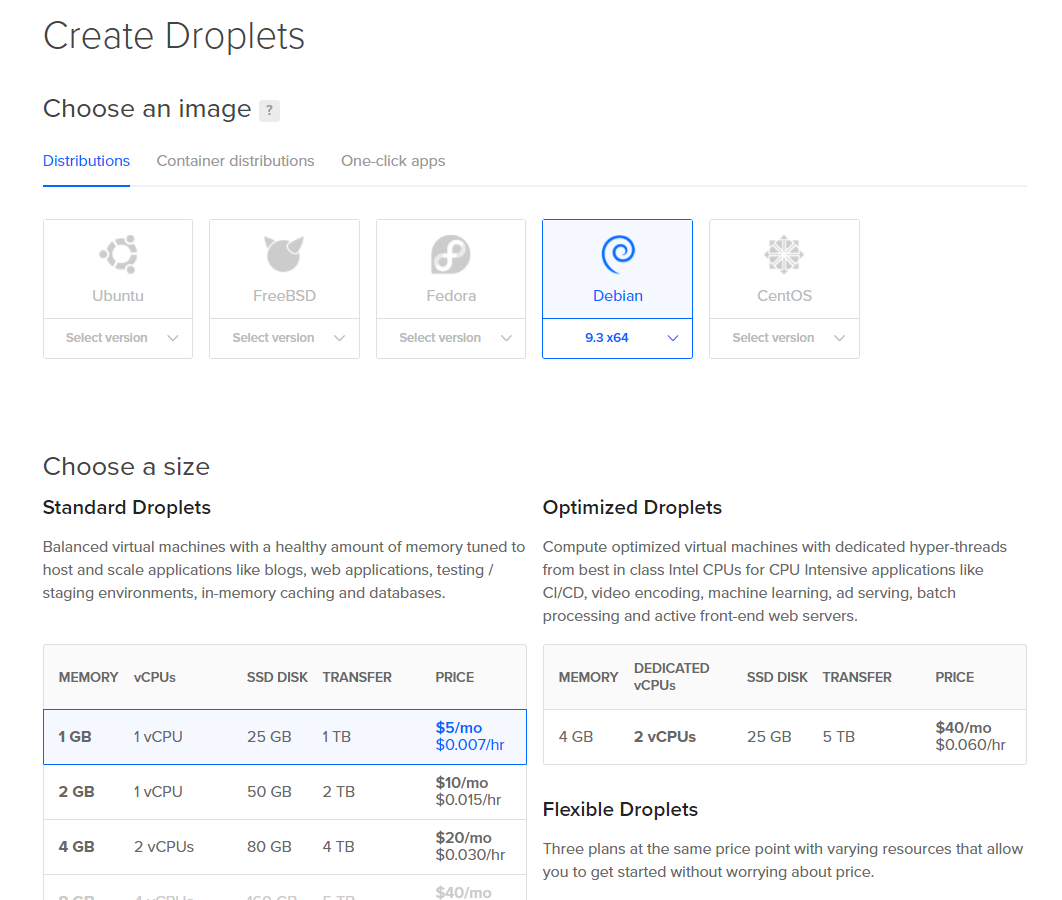
At the time of writing, a digital ocean droplet costs about $5/month and is billed by usage.
Creating a droplet is simple. Create an account at Digital Ocean and then pick the following configuration options:
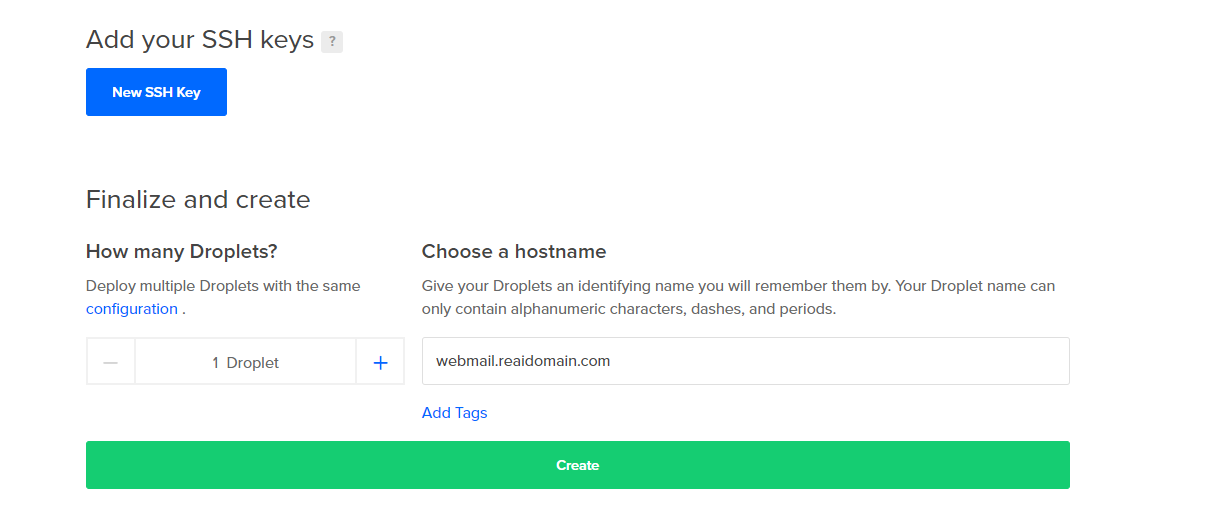
Additionally, set your hostname to the PTR record you will be using. This can be changed later but often comes with a delay of upwards of an hour. The PTR record is an ISP (not your DNS) created record which has them map an IP address to a hostname. For mail servers your mail server (exchange.domain.com, webmail.domain.com, mail.domain.com; whatever it may be) must map to the IP address of the mail server.
In our case we are going to use the servername ‘webmail’ at our domain ‘reaidomain.com’. This input is at the bottom. If you’re an awesome security practitioner, you will also upload your SSH keys:
Great! That’s all there is to it! We now have the following steps completed:
[x] Domain Name Purchased[x] Server Purchased
[x] FQDN for mail server defined
[x] PTR record configured
Step 3 — Server Configuration
Once your droplet has been purchased, you should receive some account information where you can log in to the server via SSH. There is also a dashboard (see below) where you can manage some additional components of your server.
First, let’s SSH in and set up the important pieces. Once logged in, do the following:
- apt update
- apt upgrade
- apt install git
- git clone https://github.com/n0pe-sled/Postfix-Server-Setup ##########Replace this with my branch when updated
- cd Postfix-Server-Setup
- chmod +x ServerSetup.sh
- ./ServerSetup.sh
- Option 2
- Set hostname to: webmail.reaidomain.com – THIS NEEDS TO MATCH YOUR PTR RECORD
- Reboot
This will get our system up to date and download an awesome tool provided by nope-sled ######update when I have posted updates for gophish and better config#####. The script helps to go through several tasks including generating SSH keys for secure access if needed, generating valid SSL certs using LetsEncrypt for your mail server and any landing pages which are used, installs Postfix and implements a basic configuration, installs GoPhish and also has a mail client which can be configured for mail access and setting up a catch-all mailbox to get any replies which are sent.
Once the system has rebooted, log in to the system again and perform the following tasks
- cd Postfix-Server-Setup
- ./ServerSetup.sh
- Option 4
- Type the name of the sites which will be used, in our case type the following: webmail.reaidomain.com
- Press enter and then type ‘done’ followed by enter again.
- This may fail on the first try, if it does, reopen the script and repeat the task again. There are some prereqs that may not be installed which it will correct if they are missing the first time.
- Option 5 (Postfix Setup)
- Select ‘Internet Site’ from the dropdown menu
- Just press ‘enter’ on ‘Relay IPs’ as we are not allowing relay through this server
- type ‘root’ as the user to receive mail
- Option 7 (DNS Entries)
- Copy these to a note taking program
- Option 8 (GoPhish)
- Type ‘n’ when it asks to implement SSL, we will do that separately.
- Option 10.
Congrats! You now have a mail server with GoPhish and valid SSL certificates! If you were going to whitelist your sending IP with your company’s spam filter, you could begin your campaigns with GoPhish right away, if this is your goal, skip ahead to the GoPhish section. However, this guide will go through a more comprehensive setup for the system.
Postfix Config
DNS Config
GoPhish Config
Testing
GoPhish UI
Get Phishing!
Going Deeper and Analytics #Browser exploit framework, correlating data, multi-campaign target & ruse campaigns
Providing Training and Increasing Awareness
Prevention Techniques
I keep coming back. Useful info for sure.